Garry’s Mod Beginner’s Guide
If you’re new to Garry’s Mod and want to learn how it works and plays, this guide is for you! Features recommended steps, tips, and controls!
1. Get Started
Welcome to the beginner’s guide for Garry’s Mod!
Garry’s Mod, sometimes abbreviated as “GMod”, is a first-person sandbox game where you can load up a world (map), and build many/crazy contraptions, explore the worlds or battle other players or monsters. (Like zombies, evil alien soldiers, alien bugs etc.) This guide will give you a look into how to play the game, what to do, and also some useful tips with stuff!
This guide shall assume this is your first time playing the game.
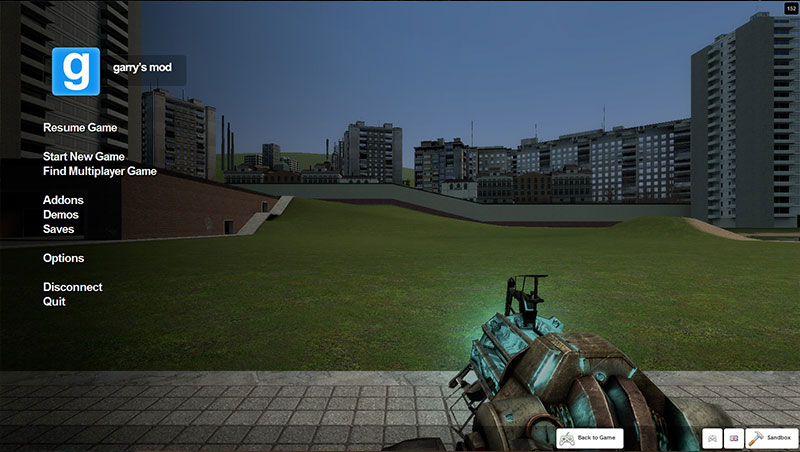
When you start up the game you shall be greeted with a menu: (The background is a slideshow of images that change periodically)
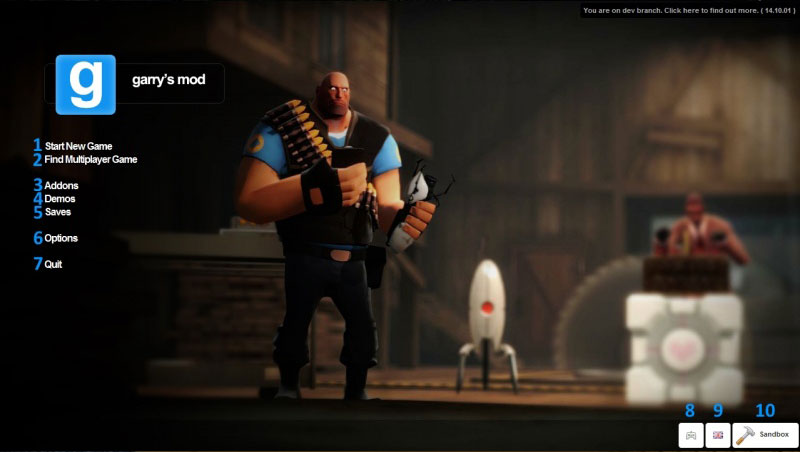
I would recommend that you first take a look at your graphics settings by clicking “Options”, then clicking the “Video” tab, then clicking “Advanced…”. This is some pretty technical stuff, and you could end up breaking the game if you mess around with these settings!
These particular settings determine how realistic the game’s graphics look. Having them low will make the game run faster, but look less detailed. Having them high will make the game look more like real life, but it can slow the game down, and by A LOT if your computer isn’t fast/powerful enough! The resolution outside the Advanced settings determines how clear/HD the game looks. Yet again, lower = faster but blurrier, higher = clearer but slower.
Enough of the graphics settings. Before we get to actually playing the game, we need to look at just one more thing… The controls!
If you have played a Source engine-powered game before, such as Half-Life 2, Portal, Counter-Strike Source/Global Offensive or Team Fortress 2, you should probably know (Most of) the controls already. If you do, then you should continue to the next section now. If you don’t know the controls, or haven’t played any games based on the Source engine before, you probably should read the rest of this section!
The defaults are as follows:
W, A, S and D keys – Move around
Moving the mouse – look around/aim (When you press W, you move in the direction you’re looking)
Left mouse button – Fire weapon/tool
Right mouse button – Varies, depending on what weapon/tool you’re holding
R key – Reload weapon/varied actions, depending on what tool the Tool Gun is set to
Q key – Open the Spawn Menu. Menu closes when Q key is released! F1 toggles the menu
V key – Toggles “No-Clip”. Lets you fly around the level
Left shift key – Sprint (Move faster)/increase flying speed when “No-Clip” is on
Left control (Ctrl) – Crouch (Move slower)/decrease flying speed when “No-Clip” is on
F key – Flashlight (Lights the area in front of you, but can slow down the game when on, due to it’s dynamic lighting feature)
That is all you primarily need to know to get started with Garry’s Mod. You can learn the rest of the controls by opening the Options menu and clicking the “Controls” tab, or by just exploring the game yourself, and learning the controls and other stuff along the way!
Now we are going to get onto actually playing the game! (Continue to next section)
2. Playing in Singleplayer and using the Physgun
In this section we are going to now actually start playing Garry’s Mod!
First click on “Start New Game”. There will then be a menu letting you choose which map you want to play in. It should look like this:

Click on the one that says “gm_construct”, then click “Start Game”.
After the map has loaded, you should see something like this:
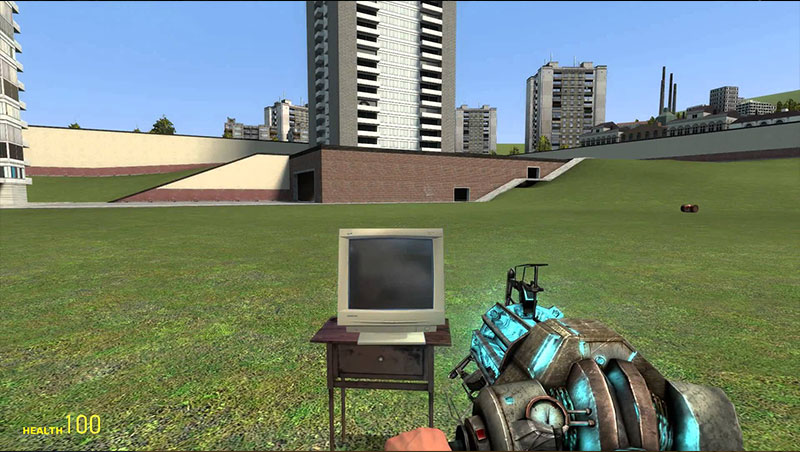
Congratulations! You are now inside the game world, ready to play!
You should now have a little walk around, and get acquainted with your surroundings.
When you are ready, hold down Q to open the Spawn Menu. To keep it open, you need to keep Q held down. Look at the lists of objects, then click on and object’s icon to spawn it. You should be aiming/looking at the ground in front of you, because when you spawn something from the Spawn Menu, it spawns right in the direct center of your screen. This is shown by a few dots in the center. Releasing the Q key closes the spawn menu.
Now that you have spawned some objects, I bet you’re asking yourself, “How do I move this stuff around?”. Well, you should be holding a weird sort of gun in your hands, glowing blue by default. (It’s shown in the image above) This is called the “Physgun”, being short for “Physics Gun”. It allows you to manipulate objects and other stuff in the game. If you are not holding it, the scroll wheel on your mouse allows you to select different weapons and tools. When you have highlighted the weapon/tool you want to select, just left click! If your mouse doesn’t have a scroll wheel, the number keys (1 to 6) can be used to select weapons/tools instead. With the physgun equipped, aim at the object you spawned and left click on it. As long as you have the left mouse button held down, you will be “holding” it with the physgun. If you move the mouse around while holding the object with the physgun, (Keep left mouse button held down) it will move around with the camera. If you hold down E while holding an object with the physgun, you can rotate the object by moving the mouse around. Pressing the forward or backward movement keys (W and S) with E held down, you can move the object forward and backward! This can be useful for placing stuff in/onto places or other stuff with precision. If you right click while holding something with the physgun, it will freeze that object into place. Pressing the R key twice will un-freeze everything you have frozen. Please note that NPC’s (Non-Player Characters) and vehicles cannot be frozen, even though vehicles will show the green flash effect that is given off when something has been frozen.
If you ever want or need to fly around the map to get to a particular spot, or to get up close to a usually inaccessible part of something you’re making, you can use the “No-Clip” mode to fly around and go through stuff! It is, by default, toggled with the V key.
There are many, many things that can be done in Garry’s Mod, like building rockets that people can ride, super cars that go as fast as lightning, catapults that shoot stuff over long distances, there is quite a damn lot of things you can do in this game, but it’s even more fun when you can do all this with other players! See the next section on how to play online with other players!
3. Playing in Multiplayer
Please note that you must have a working internet connection and a connection to Steam in order to follow this section of the guide.
In this section, we will play on a Garry’s Mod multiplayer server with other players on the internet!
First, pause the game by pressing the Escape key (Esc). It will pause the game for you, and show you the menu, as seen below:
Click on “Find Multiplayer Game”. This will show a list of gamemodes in use by all servers. For now, you should search for, and click on the one that says “Sandbox”, with the icon being a wrench. You should then search for a good server that has a low ping, (Higher ping = slower connection to server/high traffic on server) is in your country, is not empty or full, and the map it’s on is either gm_construct or gm_flatgrass.
If the server has custom content that you don’t have, (E.g. Custom map, object, NPC, vehicle, Tool Gun tool, etc.) it will automatically download it for you while connecting to the server. When you have fully connected to the server, you will spawn in the map just like in singleplayer, except there will also be other players playing in it too.
While you are there, there is a couple of other things you should know first: pressing the Y key lets you type in a message to send into the server’s chat, letting you talk to other players. With some configuration through Steam and a little bit of settings tweaking, you can also use a microphone to chat to other players! Also, you can change the appearance of yourself in multiplayer by opening the Player Model menu by holding down the C key, then clicking Player Model. You can change the looks of your character, their color, and also the physgun’s color, too! Changes to your player model take effect when you respawn, by dieing or disconnecting from the server, then reconnecting.
Have fun playing with other players! Make sure you don’t misbehave on it though. It could get you automatically disconnected from the server, (Known as being “Kicked”) or even banned from it! See the next section on how to download add-ons from the Steam Workshop!
4. Add-ons and the Steam Workshop
WARNING: Some of the content on the Steam Workshop may be inappropriate for younger players. I recommend that younger players first get help from an adult before heading onto the Add-ons menu! After all, the majority of Steam’s user-base are mostly older players…
In this section, we will look at the Steam Workshop, a service on Steam which allows users to create, download, rate and share add-ons for various games on Steam, including Garry’s Mod.
An “add-on” is a small modification for a video game, which could be a new car, gun, prop, map, etc..
My guide on how to create maps for Garry’s Mod explains how to upload Add-ons to the workshop via the game’s creator’s uploading tool, although every type of Garry’s Mod Add-ons (Except maps)
can be uploaded in-game.
First, we return to the main menu. There is a button that says “Add-ons”. Click on it. Now, there should be a massive menu containing a bunch of stuff with lots of pictures and text. These are all Add-ons made by other players! There are many types of Add-ons available, but you should try looking for a good map. Click on “Maps”, then click on “Top Rated”, if it’s not already selected. Search for a map, and if you think it looks good, hover over it, then click “Install”. Garry’s Mod will then start downloading the Add-on. Once it’s finished, you will be able to try it.
5. Conclusion
In this guide, you have been taught how to:
- Play the game
- Connect to a multiplayer server
- Download addons for the game
Now, the guide has come to it’s conclusion. Most of the stuff you will learn about the game will be discovered by yourself.
Thanks for reading!


Understanding Modded APKs
I must emphasize that using modded APKs (modified application packages) to access games or…
Fortnite Season 6 – All Weekly Challenges – Walktroughs
Hey guys, welcome to this ultimate list of weekly challenges for Fortnite season 6, …